
In one of my previous blog posts, “Guide to Setting Up Email Workflows for Webinars,” I mentioned that smart content is a great idea if you want to target your follow-up emails to multiple segments without creating multiple if/then statements in a multi-step workflow.
This blog post will cover how exactly to create those smart emails, whether you’re using GoToWebinar, Zoom, or another webinar platform.
Step 1: Segment Your Audience and Write the Emails
Before doing any work in HubSpot, decide how you want to customize your webinar follow-up emails. To demonstrate in this post, we’ll have four types of emails based on audience:
- Customers and Opportunities who attended the webinar
- MQLs and SQLs who attended the webinar
- Leads who attended the webinar
- All contacts who registered but didn’t attend the webinar
As an example, here’s what those four emails might look like:
1. Customers and Opportunities who attended the webinar
Hello there,
Thanks for attending our webinar, “[Title of Webinar].” We hope you enjoyed it!
You can access the slides and recording here.
Please feel free to pass these along to colleagues who may be interested.
Thanks again,
Jessica
2. MQLs and SQLs who attended the webinar
Hello there,
Thanks for attending our webinar, “[Title of Webinar].” We hope you enjoyed it!
You can access the slides and recording here.
I would like to set up a call to see what you thought about the event and the industry in general. Does next week work for you?
Thanks again,
Jessica
3. Leads who attended the webinar
Hello there,
Thanks for attending our webinar, “[Title of Webinar].” We hope you enjoyed it!
You can access the slides and recording here.
We also invite you to fill out this survey to let us know what you thought about the event and what topics we should cover in the future.
Thanks again,
Jessica
4. All contacts who registered but didn’t attend the webinar
Hello there,
According to our system, you weren’t able to make it to our webinar today, “[Title of Webinar].” We are sorry we missed you!
If you are still interested, you can access the slides and recording here.
Please feel free to pass these along to colleagues who may also be interested.
Thanks again,
Jessica
(Note on this last email: The form to access the recording should be smart to adjust to two segments: leads and customers. Leads will need to answer qualifying questions to access the recording, whereas customers just have to input their email addresses to gain access.)
Once we’ve drafted our emails, we’re ready to go!
Step 2: Create Your Lists
If you are using GoToWebinar, Zoom, or another platform with a HubSpot integration, you’ll be able to use list criteria to populate the lists for your email sends. (Conveniently, you can create your lists before the webinar happens; your lists will just be empty until the event is over.)
To make your emails smart based on the webinar’s status, you’ll first want to create an active list. We’ll start by making a list for the first segment of customers and opportunities who attended the webinar. In the “Filter” section, choose the following:
- GoToWebinar: Select “GoToWebinar webinar,” then choose “Attended” and pick your webinar. (Link)
- Zoom: Select “Zoom,” then “Webinar Attendance Event properties,” choose “Webinar Name,” and then enter the name of your webinar. (Link)
- BrightTalk: Select “Contact properties,” choose “BTLK Activity Message,” choose “has ever contained” and then “Viewed [Name of Webinar] Live.” (Link)
Next, you’ll want to add “AND” criteria and make lifecycle stage equal to Customer or Opportunity.
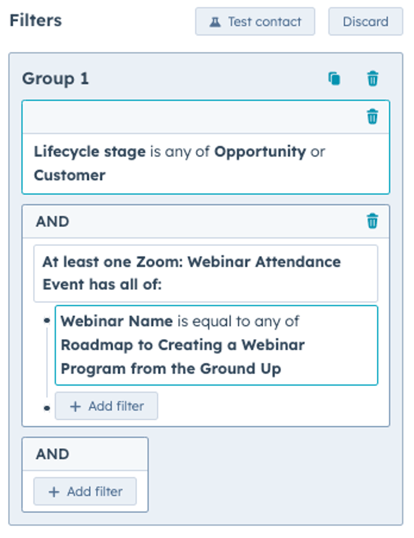
Name and save your list, and you’re done with the first segment.
You’ll want to repeat this process for lists No. 2 and No. 3, including other lifecycle stages where it’s appropriate.
For the fourth and final list, you’ll want to add two criteria: “Contact has registered for your webinar” and “Contact has not attended your webinar.” A common mistake users often make is to only filter by “Contact has not attended the webinar.” If you forget the “register” criteria, you’ll populate the list with everyone who didn’t attend (including people who didn’t register), which might be almost your entire database.
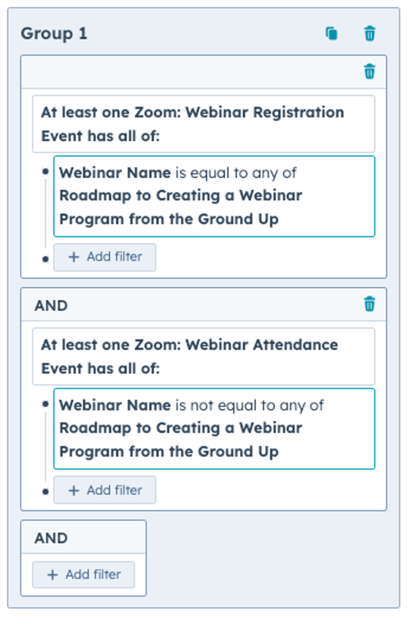
» If You’re Using a Platform Without an Integration, Import Your Lists
For products that don’t have an integration with HubSpot, you’ll need to import a list or lists after the webinar is over (Contacts > Lists > Import button at top right).
There are two ways to do this:
- The first way is to create a new column for the contacts’ webinar status: “attended” or “didn’t attend.” You’ll import this column as a new contact field in HubSpot, and if you want to keep statistics and cross-reference who attended which event later, you’ll need to create a new field every time you launch a new webinar.
- The other way to import your list is to break it into two files: one for those who attended and one for those who didn’t. When you import each list, name it appropriately. That way you can reference the correct static list at any point in the future.
Which method you choose is up to you. Just remember that being consistent will save you headaches in the long run.
(One note: When importing contacts, HubSpot uses email addresses for deduplication. Anyone who registered with a different email address will be created as a new contact. This is also true with people who download any content from your website in general.)
Once you have imported your file(s), you should make the four active lists outlined above if you would like to also segment by lifecycle stage.
Want to get everything ready to go before the webinar? Here’s a tip: Create your four active lists, named for each of your four segments and with the lifecycle stage criteria selected. After the webinar is over, upload your lists. Next, go back to the active lists you already created and add criteria for being on the webinar status list you just uploaded.
Step 3: Create Your Smart Email
Once you’ve written your emails and created the lists, you’re ready to create your smart email (Content > Email > “Create email” button at top right; choose “Regular”).
In the main body of the email, paste your default text. Your default text will appear to anyone who isn’t on any of your lists (which shouldn’t happen, but just in case):
Hello there,
Thanks for your interest in our webinar, “[Title of Webinar].”
You can access the slides and recording here.
Please feel free to pass these along to colleagues who may be interested.
Thanks again,
Jessica
(Note: You could use the default as one of your four lists; however, I find using a default more confusing when you’re trying to piece together processes and replicate them for the next webinar.)
After finishing the default email, click elsewhere, mouse over the body of the email, and click on the “More” drop-down to see the “Add smart rule” option.
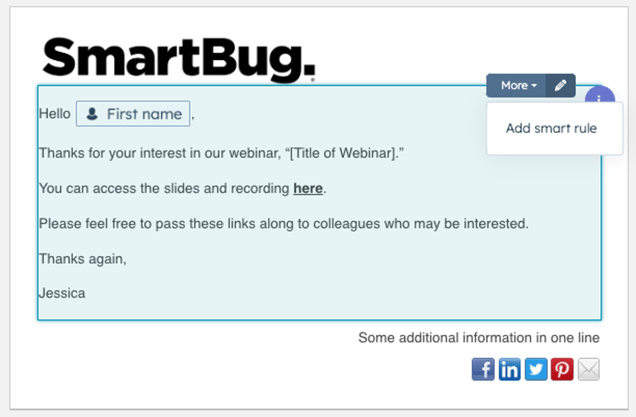
Choose “Contact List Membership,” add a rule, and then select your first list. Repeat for your other rules and lists. Each segment (i.e., each different email you want to go out) will need a list and a rule referring to that list. (Make sure to click the "Save" button.)
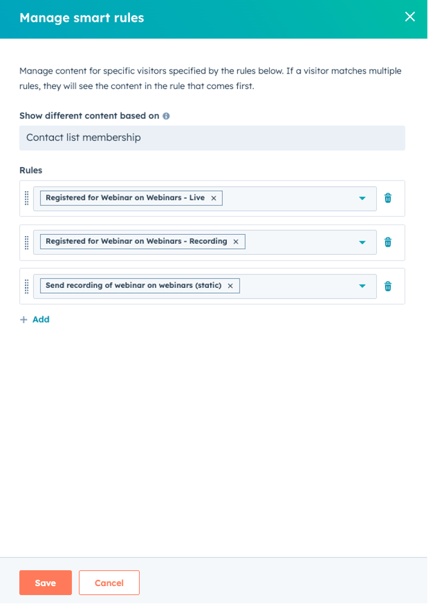
(You will now see a tag in the top right of your email that says “Smart module.”)
When you click on the body of your email, the smart variation options will appear on the left-hand side of the screen. When you choose a different rule (under “Editing for:”), you can paste in the email copy for that segment. Repeat for the other segments.
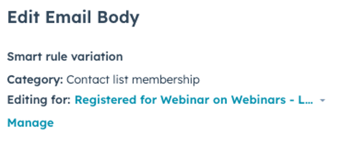
Finish your email by choosing the person the email is from, subject line, preview text, internal email name, subscription type, and campaign.
Under “Send or schedule,” select your four lists under “Send to” and choose whether you want to “Send now” or choose a date in the future. Finally, click the “Review and send” button!
Smart content in emails is an excellent way to segment your webinar attendees and non-attendees and deliver a customized message targeted to their experience. When you want this message to be laser-focused, smart content with active lists is the way to go.
Have any tips or tricks you’ve picked up for webinar follow-up emails? Tell us about them by tweeting at @smartbugmedia.
This post was originally published in May 2016 and has been updated since.

About the author
Jessica Vionas-Singer was formerly the Senior Director of Client Success at SmartBug Media where she lead a team of SmartBugs who focus on HubSpot onboarding for clients new to the system and other project-based work, oversaw new employee onboarding, and rolled out new process and procedures within the Client Services department. She fell in love with marketing at her first job at a technology company specializing in credit evaluation software. Her background includes more than 20 years of marketing experience in content creation and lead-driving tactics, online presence and blog creation, social media engagement, budgeting and project plans, webinar and trade show event management, public relations, comprehensive promotional campaigns, and analytics. Jessica has a BS in Sociology from Montana State University – Bozeman. Read more articles by Jessica Vionas-Singer.




-2.png?width=800&length=800&name=Blog%20header%20image%20(1)-2.png)